How to configure wired temperature sensors
The GARM system supports the integration of digital wired temperature sensors via the 1-Wire interface. These sensors are ideal for monitoring temperature in various environments such as indoor spaces, outdoor areas, boiler rooms, warehouses, or refrigeration units.
This guide provides instructions on how to connect these sensors to the hub, configure their display, and set threshold values for system responses.
Before installation
You can connect up to 15 temperature sensors to a single GARM hub. However, for optimal performance, it's recommended to connect no more than 10 sensors to a single 1-Wire bus.
Installation Recommendations:
-
Use cables with a cross-sectional area not exceeding 0.5 mm².
-
Prefer shielded cables to minimize electromagnetic interference.
-
Ensure the cable length does not exceed the manufacturer's specified limits, typically between 100–150 meters.
-
Avoid routing cables near high-voltage (220 V) lines.
-
Ensure reliable connections and protect contacts from moisture, especially in damp environments or outdoor installations.
-
Each sensor must have a unique digital address for proper identification within the system.
To ensure accurate detection of all connected temperature sensors, verify that each sensor possesses a unique digital address.
Additionally, it's crucial to properly terminate the 1-Wire line in accordance with standard requirements. Proper termination ensures stable data transmission and prevents operational failures.
|
1. Locate the 1-Wire terminal on the hub controller
2. Connect the sensor to the terminal following the appropriate wiring diagram
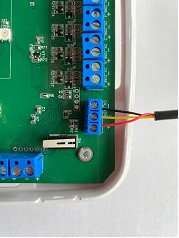
Connecting the temperature sensor
For multiple sensors, employ a parallel connection scheme to allow the system to recognize each sensor individually.
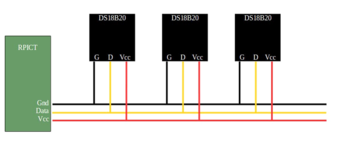
Connecting multiple sensors
Ensure correct polarity during connection and do not exceed the recommended number of sensors on a single 1-Wire line.
|
Adding the sensor in the application
After physically connecting the sensor to the hub, proceed with the following steps in the GARM application:
1. Open the GARM application
2. Navigate to the main screen
3. Go to Object settings → Equipment
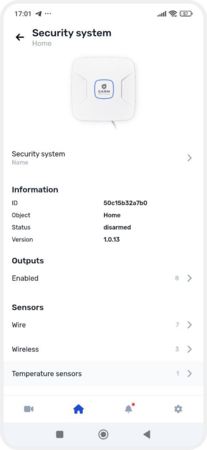
4. In Equipment, select the hub to access its settings
5. Under the hub's sensors, choose Temperature sensors
6. Tap the  icon in the upper corner of the screen to add a new sensor


Adding a sensor
7. The application will initiate a search for connected sensors.
If the sensor is properly connected, it will be detected automatically.


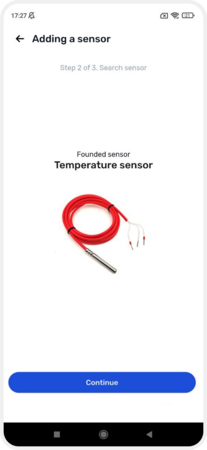
Adding a sensor in the application
Configuring the sensor
Once the sensor is detected:
1. Assign a name to the sensor
2. If necessary, associate the sensor with a specific output. Refer to the article on outputs for detailed instructions
3. Set threshold values — these are temperature limits that trigger system actions, such as activating or deactivating a relay
4. Optionally, link the sensor to a specific zone. For guidance on managing zones, consult the article How to create and manage zones


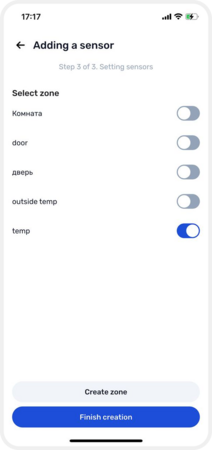
Configuring the sensor
Displaying temperature on the object screen
To have the temperature readings appear on the object's page:
1. Ensure the sensor is enabled
To enable the sensor, navigate to Object settings → Equipment → Hub settings → Temperature sensors, and toggle the Enable sensor option for the desired sensor.
2. Activate the Display indicators on the object page option
3. After making these changes, update the device configuration to apply the settings


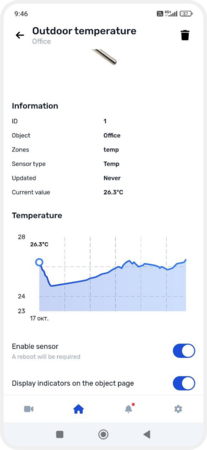
Setting up temperature display on the object page
Updating the configuration
To apply any changes made to the equipment settings:
1. Return to the main screen of the object
2. A notification stating The device configuration needs to be updated will appear at the top — tap on it
3. Confirm the update by selecting Update and reload
4. Wait for the update process to complete

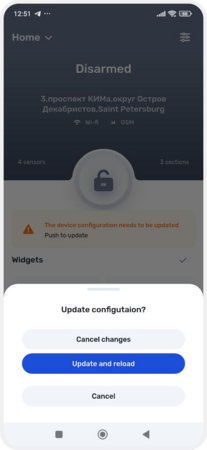
Configuration update
Following the update, the sensor's data will be displayed in the Favorites section on the object's main page.
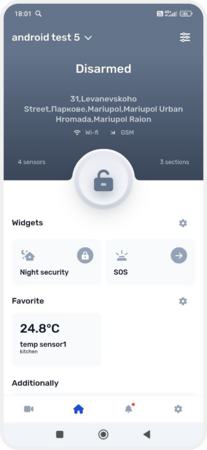
Sensor readings on the object screen